• The CraftSessions Story
  • Our Past Retreats
  • Blog
  • Newsletter
  • Contact
Menu

The Craft Sessions

Street Address
City, State, Zip
Phone Number

The Craft Sessions

  • About
    • The CraftSessions Story
    • Our Past Retreats
  • Blog
  • Newsletter
  • Contact

Dyeing - With Indigo and Food Waste

Guided by textile designer, researcher, artist and textiles teacher Joanna Fowles, we will be using food scraps and waste from The Craft Sessions weekend retreat. Utilising what we have available (onion skins, cabbage, avocado pits etc) we will convert this waste into precious dye before it hits the compost heap. We will also use a beautiful pre prepared indigo vat.

Students will explore simple shibori stitch and fold resist techniques to then immerse in a variety of natural dye baths.

Teacher: Joanna Fowles

Workshop Duration: Full Day

Description: Natural dyes and the process of dye will be discussed.

Swatches of shibori samples will be shown alongside discussion of three simple techniques - stitch, wrapping and folding. Students will then have the opportunity experiment on small text swatches a variety of explorations.

Materials to bring:
Optional Kit for each student to purchase at $35 which includes:
1.5 x metre organic cotton pre washed
10 x metres wool yarn
10 x metres cotton yarn
20cm alpaca wool fabric swatch

Or students are to bring:
1-2 metres pre washed natural fibres - cotton / silk / linen / wool
yarn - wool / silk or cotton

Takeaway: A basic understanding of natural dye, fibre types and preparation of fibres. A beautiful selection of samples.

Level: Beginner

Prerequisites: None

Homework: Pre wash any fabrics you are bringing to class.

NaturalDye-6.jpg
NaturalDye-4.jpg
FeliciaSemple-151.jpg

Knitting - Scandinavian Knitting

What makes Scandinavian colourwork different from other knitting traditions? Mary Jane Mucklestone is just the woman to help you explore this question and more as you delve into the world of this fabulous technique.

Teacher: Mary Jane Mucklestone

Workshop Duration: Half Day

Description: We will explore colour choices and the classic motifs used in Scandinavian stranded knitting as well as exploring techniques for tacking down extra-long floats found in many motifs. We will tackle the Norwegian purl and a different way of executing garter stitch in the round. We will also explore ideas for combining motifs and adding colourwork to liven up your future projects. We will begin our exploration by starting a headband or hat.

Materials to bring:
T
wo or more colours of DK-weight yarn with high colour contrast, 100% wool preferred, 50-100 yards of each.
16" circular, the smallest size recommended on the ball band
16” circular one size larger than the smallest size recommended on the ball band
1 set dpn in larger size if intending to finish hat.

Takeaway: Students will learn to distinguish Scandinavian colourwork from other world traditions, understand how small motifs are combined or altered in endless variation, to create classic well loved patterns, and even design new ones of their own!

Level: Intermediate

Prerequisites: Some experience working stranded colorwork in the round.

Homework: With smallest needle and colour of your choice DK-weight yarn that you like, cast on 84 stitches, join for working in the round. Knit one round.

Screenshot 2018-04-27 16.54.18.png
Mucklestone_scandinavian_knitting.jpg

Knitting - Steeking

Steeking is a technique which involves cutting your knitting and it is not as scary as it sounds. It may even revolutionise your knitting!

If you are interested in colourwork, then knitting in the round and cutting at the end is a much easier way to make particular garments like a cardigan. A colourwork blanket may also be knitted in the round and then cut at the end. It’s also a fantastic way of making an item without purling if that is something you like to avoid.

Teacher: Adele Moon

Workshop Duration: Half Day

Description: During the class you will learn a traditional method of steeking. You will learn how to stabilise and fix the stitches with a crochet hook which will enable you to then cut through your knitting without the stitches unraveling. You will also get to see different examples of garments that have been steeked - both by hand and by machine. We will discuss the advantages and disadvantages of both methods and which method might be more appropriate for any particular project.

Materials to bring:
4mm crochet hook
Small scissors
Your swatch (details below in Homework).

Takeaway: You will leave with a swatch of steeked knitting which you can keep for reference or transform into a tea cosy

Level: Intermediate

Prerequisites: Ability to knit in the round essential on double pointed needles or a circular needle.

Homework: A swatch knitted in the round in stocking stitch on 4.5mm needles with Aran weight yarn - 80 stitches and 40 rows. You may choose to include some colourwork if you wish. Please use a pure wool. No superwash or silk.

FeliciaSemple-33.jpg
FeliciaSemple-35.jpg
IMG_8374.JPG
FeliciaSemple-31.jpg

Handwork - Handpiecing

This workshop will enable crafters to learn how to make a hand pieced patchwork using hexagons. Anna will instruct and guide participants in how to use paper templates and hand stitching the English paper piecing way. It is a great method of making for using up scraps and recycling worn clothing.

Teacher: Anna Farago

Workshop Duration: Half Day

Description: We will kick off with a show and tell of what is needed to make hand-pieced patchwork using the English paper piecing method.

Anna will do a demonstration (with a few stories thrown in) about her process of making with hexagons. She will discuss hand piecing with and without paper. During the workshop Anna will also chat about colour, texture and pattern when making patchwork. She will share examples of works-in-progress and other references for inspiration. Anna will have tubs of fabric scraps and worn clothing on hand for participants to use to start their own hexagon patchworks.

Materials for participant to bring:
Fabric scissors
Non-fabric scissors
Greylead pencil
Ruler
Needles with sharp point
Scraps of fabric or worn clothes to cut up (or not – I will have plenty to choose from)

Supplied:
Tubs of fabric scraps
Samples and examples of patchwork made using the techniques used during the workshop.

Takeaway: Workshop participants will take away their hand-pieced patchwork to continue working on, which could become a cushion cover or quilt top. They can also take away scraps of fabric, hexagon paper templates and class notes.

Level: Beginner - Intermediate

Prerequisites: None

Homework: None

Farago_hexagon_detail copy.jpg
Farago_hexagon_corner copy.jpg
Farago_hexagon_toes copy.jpg
Farago_hexagon_above.jpg

Knitting - Two Colour Knitting

Join the intrepid and inventive Mary Jane Mucklestone in this half day class exploring the intricacies and beauty of two stranded colourwork knitting. This class is for absolute stranded knitting beginners and those looking to brush up on their technique.

Teacher: Mary Jane Mucklestone

Workshop Duration: Half Day

Description: In a relaxed setting, Mary Jane introduces you to the world of stranded colourwork, often called Fair Isle knitting. In this technique class we will learn the basics, covering several methods of holding your yarns, reading charts, how to introduce new colours, what yarn dominance is, how to avoid tangled yarns, weaving in those pesky ends, and finishing techniques. We will begin knitting a stranded colourwork headband or hat.

Materials to bring:
2 or more colours of worsted weight yarn (make sure the colours have high contrast), 50-100 yards each.
16” circular needles in US 6 (4mm) and US 7 (4.5mm).
One set of dpn in US 7 (4.5mm) if making a hat.
Your usual ditty bag of knitting notions, including stitch markers, tape measure, scissors and tapestry needle, paper and pencil for notes.

Takeaway: Students will end up with many tips and tricks to ensure confidence when tackling colourwork knitting.

Level: Advanced Beginners

Prerequisites: Experience of working in the round.

Homework: On smaller needle cast on 84 stitches. Join for working in the round, taking care not to twist stitches. K1, p1 rib for 1 inch (2.5cm).

TwoColour.jpg
Screen Shot 2018-04-23 at 9.43.06 PM.png
Screen Shot 2018-04-23 at 9.42.40 PM.png
Screen Shot 2018-04-23 at 9.54.40 PM.png

Handwork - Darning

After investing all our time and skills in the making of our clothes we want those items to last the distance. Learning how to fix them is a valuable skill to extend the working life of these items. In this workshop, learn how to maintain and care for your hand knits so they last for years through the age old art of darning.

Teacher: Adele Moon

Workshop Duration: Half Day

Description: In this half day session you will learn a variety of darning techniques, from basic to more advanced. You will have an opportunity to master Swiss darning, the genius knit and graft method and have a go at woven darning while we discuss the uses and applications for each one. We will also look at ways to make a feature of your darning through visible mending techniques or how to disguise your holes invisibly.

Materials to bring:
Blunt tapestry needle
4mm double pointed needles
The swatches detailed in the Homework below.

Takeaway: You will have some swatches of darning to take away with you to use as a reference for all future mending.

Level: Intermediate

Prerequisites: No darning experience required.

Homework: 3 x knitted swatches in a plain colour non superwash dk wool on 4mm needles - 30 stitches by 38 rows

Darning-1.jpg
Darning-2.jpg
Darning-3.jpg

Knitting - Top-down Raglan In A Day

Spend the day with Georgie Nicolson exploring the fundamentals of both knitting a top-down raglan and experimenting with this well-loved construction.

Teacher: Georgie Nicolson

Workshop Duration: Full Day

Description: Using a pattern designed specifically for this class, we will explore how a traditional top-down raglan is created. Georgie will explain her design process and how she calculates the essentials for each section as we spend the morning knitting a baby-sized raglan yoke.

In the afternoon session, we will explore how this traditional structure can be deconstructed and experimented with to create interesting variations. Find out what the term hybrid-raglan means. In preparation for finishing our wee cardigan, we will also look at a number of finishing techniques that will take your raglan knitting to the next level. Create button-bands that sit neatly, underarms that don’t need darning and sleeves that please even the fussiest wearer.

Materials to bring:
Approximately 250 yards/230 metres of DK/8ply weight yarn. A woollen based yarn is recommended. You may wish to bring multiple colours for experimenting.
An 80cm circular in the size required to achieve stocking stitch tension (22 sts and 30 rows = 4”). Recommended needle size: 4mm/US6
An 80cm circular two sizes smaller than that required to achieve tension. Recommended needle size: 3.5mm/US 4.
Preferred option for small circumference knitting in the needle size you achieved tension with; one long circular for magic looping, two circulars, double pointed needles, or even a teeny 20cm circular
4 stitch markers
Waste yarn, darning needle, measuring tape and scissors.

Takeaway: At the end of the class you will walk away with an increased understanding of the nuances of raglan construction as well as the confidence to experiment with this traditional construction. You will also have a partially completed sweet wee cardigan.

Level: Beginner - Intermediate

Prerequisites: Ability to cast on, knit, purl and work basic increasing and decreasing stitches.

Homework: It is recommended that knitters swatch prior to this class. You will be looking to knit this garment at a tension of 22 stitches and 30 rows over 4 inches.

To swatch: cast on about 35 stitches. After working a few rows of garter stitch, continue to knit in stocking stitch until your piece is about square. Block, measure and adjust your needles as required to achieve correct tension.

Raglan-20.jpg
FeliciaSemple7.jpg
Immie.jpg
8439672173_be33c7505f_z.jpg

Handwork - Embroidery Sampler

You probably know a few embroidery stitches by name already: French knots, back stitch and running stitch, but can you do a chain stitch, a bullion or a blanket stitch? Spend the day learning embroidery with the wonderful Elizabeth Barnett! Elizabeth has designed a stitch sampler specifically for the Craft Sessions and will guide students through techniques and tips for furthering their embroidery skills.

Teacher: Elizabeth Barnett

Workshop Duration: Half Day

Description: Embroidery has long played an important role in interpreting the world around us by way of interesting, beautiful and sometimes complicated interlocking designs, made up of a series of simple embroidery stitches. Many of these stitches have stood the test of time as tried and true methods in achieving different patterns and designs.

This class is aimed at teaching you some essential embroidery stitches that will introduce you to the world of embroidery or build your knowledge further. We will showcase these stitches and designs in a embroidery sampler on linen, using your own colour palettes of embroidery threads.

Samplers are traditionally a way of showing off different stitch techniques, designs and patterns. Because some people like to follow a pattern strictly, and others like to use it as a touchstone to build their own pattern from, Elizabeth has designed a pattern that can be followed or altered to suit each student. Elizabeth will bring a reference library of more complicated embroidery stitches and will be happy to guide students in trying different things out if the time allows.

Materials to bring: Students will be provided with a piece of linen and a needle for their sampler but will need to bring 2-3 cotton or silk threads to work with, scissors and a hoop if required.

Elizabeth used a combination of DMC cottons, pearl cotton and silk threads for the sample. There are many brands of embroidery threads out there so have a look around and see which ones you like the look of. Try and choose at least one dark, one light and one mid-tone colour. Variegated silks are also fun to try.

Some suppliers of embroidery thread include;
- L’ucello, The Nicholas Building, Melbourne
- Treehouse Textiles, Mornington
- Mill Rose, Ballan
- Amitie, East Brighton
- Spotlight or Lincraft.

Takeaway: Students will come away with a stitch sampler pattern and the beginnings of their own sampler on a piece of beautiful linen fabric in their own colours.

Level: Beginner-Advanced Beginner

Prerequisites: A willingness to learn embroidery!

Homework: Students will be required to gather 2-3 colours of embroidery threads. You can also try op shops or your friend’s stashes!

sampler1small.jpg
sampler2sml.jpg
static1.squarespace-7.jpg
static1.squarespace-18.jpg

Sewing - With Silk

Silk is such a delight to wear, but let’s be honest, it can be challenging to sew. In this class you will learn lots of tips and tricks to gain confidence with sewing silk while making a relaxed fit top.

Teacher: Anna Ng

Workshop Duration: Half Day

Description: The thought of sewing with silk can be a daunting for many, but there are lots of cutting and sewing tricks that will help you sew this slippery fabric without tears.

In this technique based class, using the very versatile Lou Box Top pattern by Sew DIY, you’ll learn how to: make thoughtful design decisions reflecting your fabric choice (ie. eliminate unnecessary seams, leave off the pocket and avoid curved hems), cut out silk, select the right sewing needle for your project, sew beautiful French seams, finish the neckline with bias binding, create a narrow double fold hem. We will be sewing the crewneck and straight hem version of the Lou Box Top to ensure that we have enough time to learn the correct techniques.

At the end of the class you will have sewn your very own silk top which will look just as beautiful on the inside as the outside.

Materials to bring:
A copy of the Lou Box Top PDF Pattern and the instructions (Anna will be providing cut out patterns for each size on the day)
1m – 1.4m x 135cm or 1.5m x 115cm (see the fabric consumption chart for more details) of silk fabric
All purpose polyester thread to match your fabric
Sewing machine
Microtex sewing needle (a brand new one will give you the best results)
Fabric scissors
Silk pins (these are finer than regular pins and essential for sewing silk)
Tailors chalk
Measuring tape
Quick unpick

Takeaway: At the end of the class you will have sewn your very own silk top which will look just as beautiful on the inside as the outside.

Level: Advanced Beginner

Prerequisites: Familiarity with a sewing machine and straight-stitching experience.

Silk-2.jpg
FeliciaSemple-1.jpg

Dyeing - Semi-solid Tonals And Glazing

In this class with Hannah Ginn of Circus Tonic Handmade you will be introduced to hand dyeing knitting yarn with subtle tonal variation specifically suited for garment knitting.

Teacher: Hannah Ginn

Workshop Duration: Full Day

Description: The class will begin with a fabulous yarn appreciation session talking about dyers, different yarn bases, colours, themes and inspiration and there will be lots of examples of skeins and knitted samples to squish. A large section will focus on the art of matching hand dyed yarns to modern knitting patterns and how to achieve successful finished objects.

We will then focus on inspiration and aesthetics, which ties in to the knitted garment and how designers are using hand dyed yarns.

The class will then cover safety, personal protective equipment (PPE), a little chemistry and theory. We will cover different dyes on the market, skein management and handling and finally the actual dye pot techniques. We will aim for a subtle heathered look with possibly several shades of the same colour applied depending on time and then a glazing tone over dye to achieve depth of colour. The class will cover the process and after care of the skeins; soaking, drying, skeining, storage and environmental care.

Materials to bring: This a materials heavy class so there will be a materials cost of $50. You will be provided with:
Bare yarn mini skein pack
Dyes
Nitrile gloves
Dust masks
Safety glasses
Wire loops
Notebook and pencil
Swatch card
Disposable cups
Spoon
Syringe plunger

Each student will need to bring:
A light coloured or undyed skein from their stash.
Cotton liners for under gloves (these can be bought at the chemist)
A coloured picture or sketch for inspiration
Closed shoes, preferably not trainers with mesh tops
Hair bands for long hair

Takeaway: Each student will have learned how to manage skeins, match hand dyed yarn to patterns, which bases to start with at home, supplier tips, how to dye a semi solid tonal yarn, how to use professional acid dyes correctly, and will come away with several miniskeins of yarn they’ve dyed themselves. A swatch card may be made with their and their fellow students yarn if they would like to swap experiences and recipes.

Level: Beginner - Advanced Beginner

Prerequisites: None

Homework: The students are to bring the materials requested. They may also bring their favourite hand dyed yarn if they are interested to reverse engineer it!

Ginn-tonals_2 copy.jpg
Ginn-tonals_3 copy.jpg
Ginn-tonals_4 copy.jpg

Knitting - Joyful Shortrows

Short Rows are often considered one of those “serious” or more tricky techniques. Spend the morning with Georgie looking at short rows from a different perspective and how they can create shaping beyond socks and busts.

Teacher: Georgie Nicolson

Workshop Duration: Half Day

Description: Short rows are used to create wedges in knitting, and these wedges are used to shape shoulders, heels, hemlines, shawls and create extra ease in the bust area. This specialised short row class will begin by exploring a number of different short row techniques; the traditional wrap and turn, German Short Rows (a personal favourite), yarn over short rows and Sunday short rows. We will play around with decreasing and increasing short rows and look at their use can affect the final appearance of the short rows in your work. With an increased confidence with short rows, we will begin a simple mini-shawl pattern that makes the most of experimenting with short rows.

Materials to bring:
Participants will need to prepare a swatch for this class. Please knit this in a light coloured DK/8ply weight wool and bring to class still on the needles. Do not cast them off. See details below in Homework.

As well as the swatch, please bring along:
4mm/US6 needles (or size you usually get tension with for DK/8ply)
2 x 100g of DK/8ply weight yarn in two colours that contrast with each other
5mm/US8 needles (or two sizes bigger than you usually get tension with for DK/8ply)

Takeaway: A new appreciation for the possibilities offered by short rows.

Level: Intermediate

Prerequisites: Ability to cast on, knit, purl and work basic increasing and decreasing stitches.

Homework: With 4mm needles (or size you usually get tension with for DK/8ply) cast on 40 stitches. Work 6 rows of garter stitch. Then work 10 rows of stocking stitch.

Shortrows-1.jpg
Screen Shot 2018-04-25 at 4.01.28 PM.png
Shortrows-3.jpg
Shortrows-4.jpg

Printing - Block Printing

In the workshop you will have the opportunity to make your very own pattern blocks or use some of our simple blocks to experiment with hand printing, colour combinations and repeat layouts. Be guided by Joanna Fowles, textile designer, researcher, artist and textiles teacher at UTS, who will assist you to create a unique outcome.

Teacher: Joanna Fowles

Workshop Duration: Full Day

Description: Swatches of block printed samples will be shown alongside discussion of how to make a block out of lino or utilising found materials. Layout, repeat motifs and colour will be discussed. Students will then have the opportunity to make their own blocks, experiment on paper before creating final designs.

Materials to bring: There will be a materials fee for this class of either $25 or $40.

$40 kit: lino cutter, lino block, calico swatches, linen pack - 4 napkins & 1 teatowel

$25 kit: lino cutter, lino block, calico swatches (bring along your own fabric to print).

Additional fabric swatches - natural fibres - cotton/linen work well

Takeaway: Knowledge of basic block printing skills, layout and repeat. A printed teatowel and napkins or fabric.

Level: Beginner

Prerequisites: None

Homework: Consider what you may like to print. Any printed inspirational imagery or sketches are useful however not necessary.

20131027-698.jpg
20131027-729.jpg
20131027-718.jpg
20131027-730.jpg
20131027-734.jpg
20131027-714.jpg

Handwork - Herbal Self Care Bag

In the class you will learn basic embroidery stitches and how to translate a drawing of a herb into an embroidery, some basic sewing on the machine all the while talking about how to better look after ourselves and each other.

Teacher: Elizabeth Barnett

Workshop Duration: Full Day

Description: The Herbal Self Care bag is a gift to yourself and your health. Using Elizabeth’s herb garden cuttings we will make white on black embroideries of herbs that are used in kitchen garden medicine - Chamomile for calm, Mint for digestion or Motherwort for menstrual periods. We will sew up these bags on sewing machines and talk about what nurturing things we could fill them with, be it your knitting project, beauty products, book of poetry or your whatever your joy may be.

Materials to bring: There will be a materials fee of $22 which includes everything you need to complete your bag:
1 x Black 100% linen (30cm x 135cm),
1 x Boston Fall linen for channel strips (15 x 40cm approx)
1 x Indigo dyed organic cotton for the lining (30cm x 70cm)
1 x skein 100% cotton Japanese sashiko thread, 
1m x linen ribbon,
1 x embroidery needle. 

A 20cm bamboo hoop can be added on for $6.

Takeaway: Students will begin a beautiful embroidered bag that they can take home and fill with projects, treasures or gift to a loved one. I want this class to be slow and nurturing, not only in the making of the bag but in the consideration of self care and kitchen gardens.

Level: Beginner - Intermediate

Prerequisites: This class is for anyone and everyone with an interest in learning embroidery, chatting about gardens and herbs and a love of making.

Homework: If people are bringing their own fabric I would suggest to precut the fabric to size if possible. See dimensions above.

Barnett-web_Herb-Bag-Images-2728.jpg
Barnett-web_Herb-Bag-Images-2726.jpg
Barnett-web_Herb-Bag-Images-2720.jpg
Barnett-web_Herb-Bag-Images-2721_.jpg
Barnett-web_Herb-Bag-Images-2723_.jpg

Quilting - Machine Quilted Log Cabin

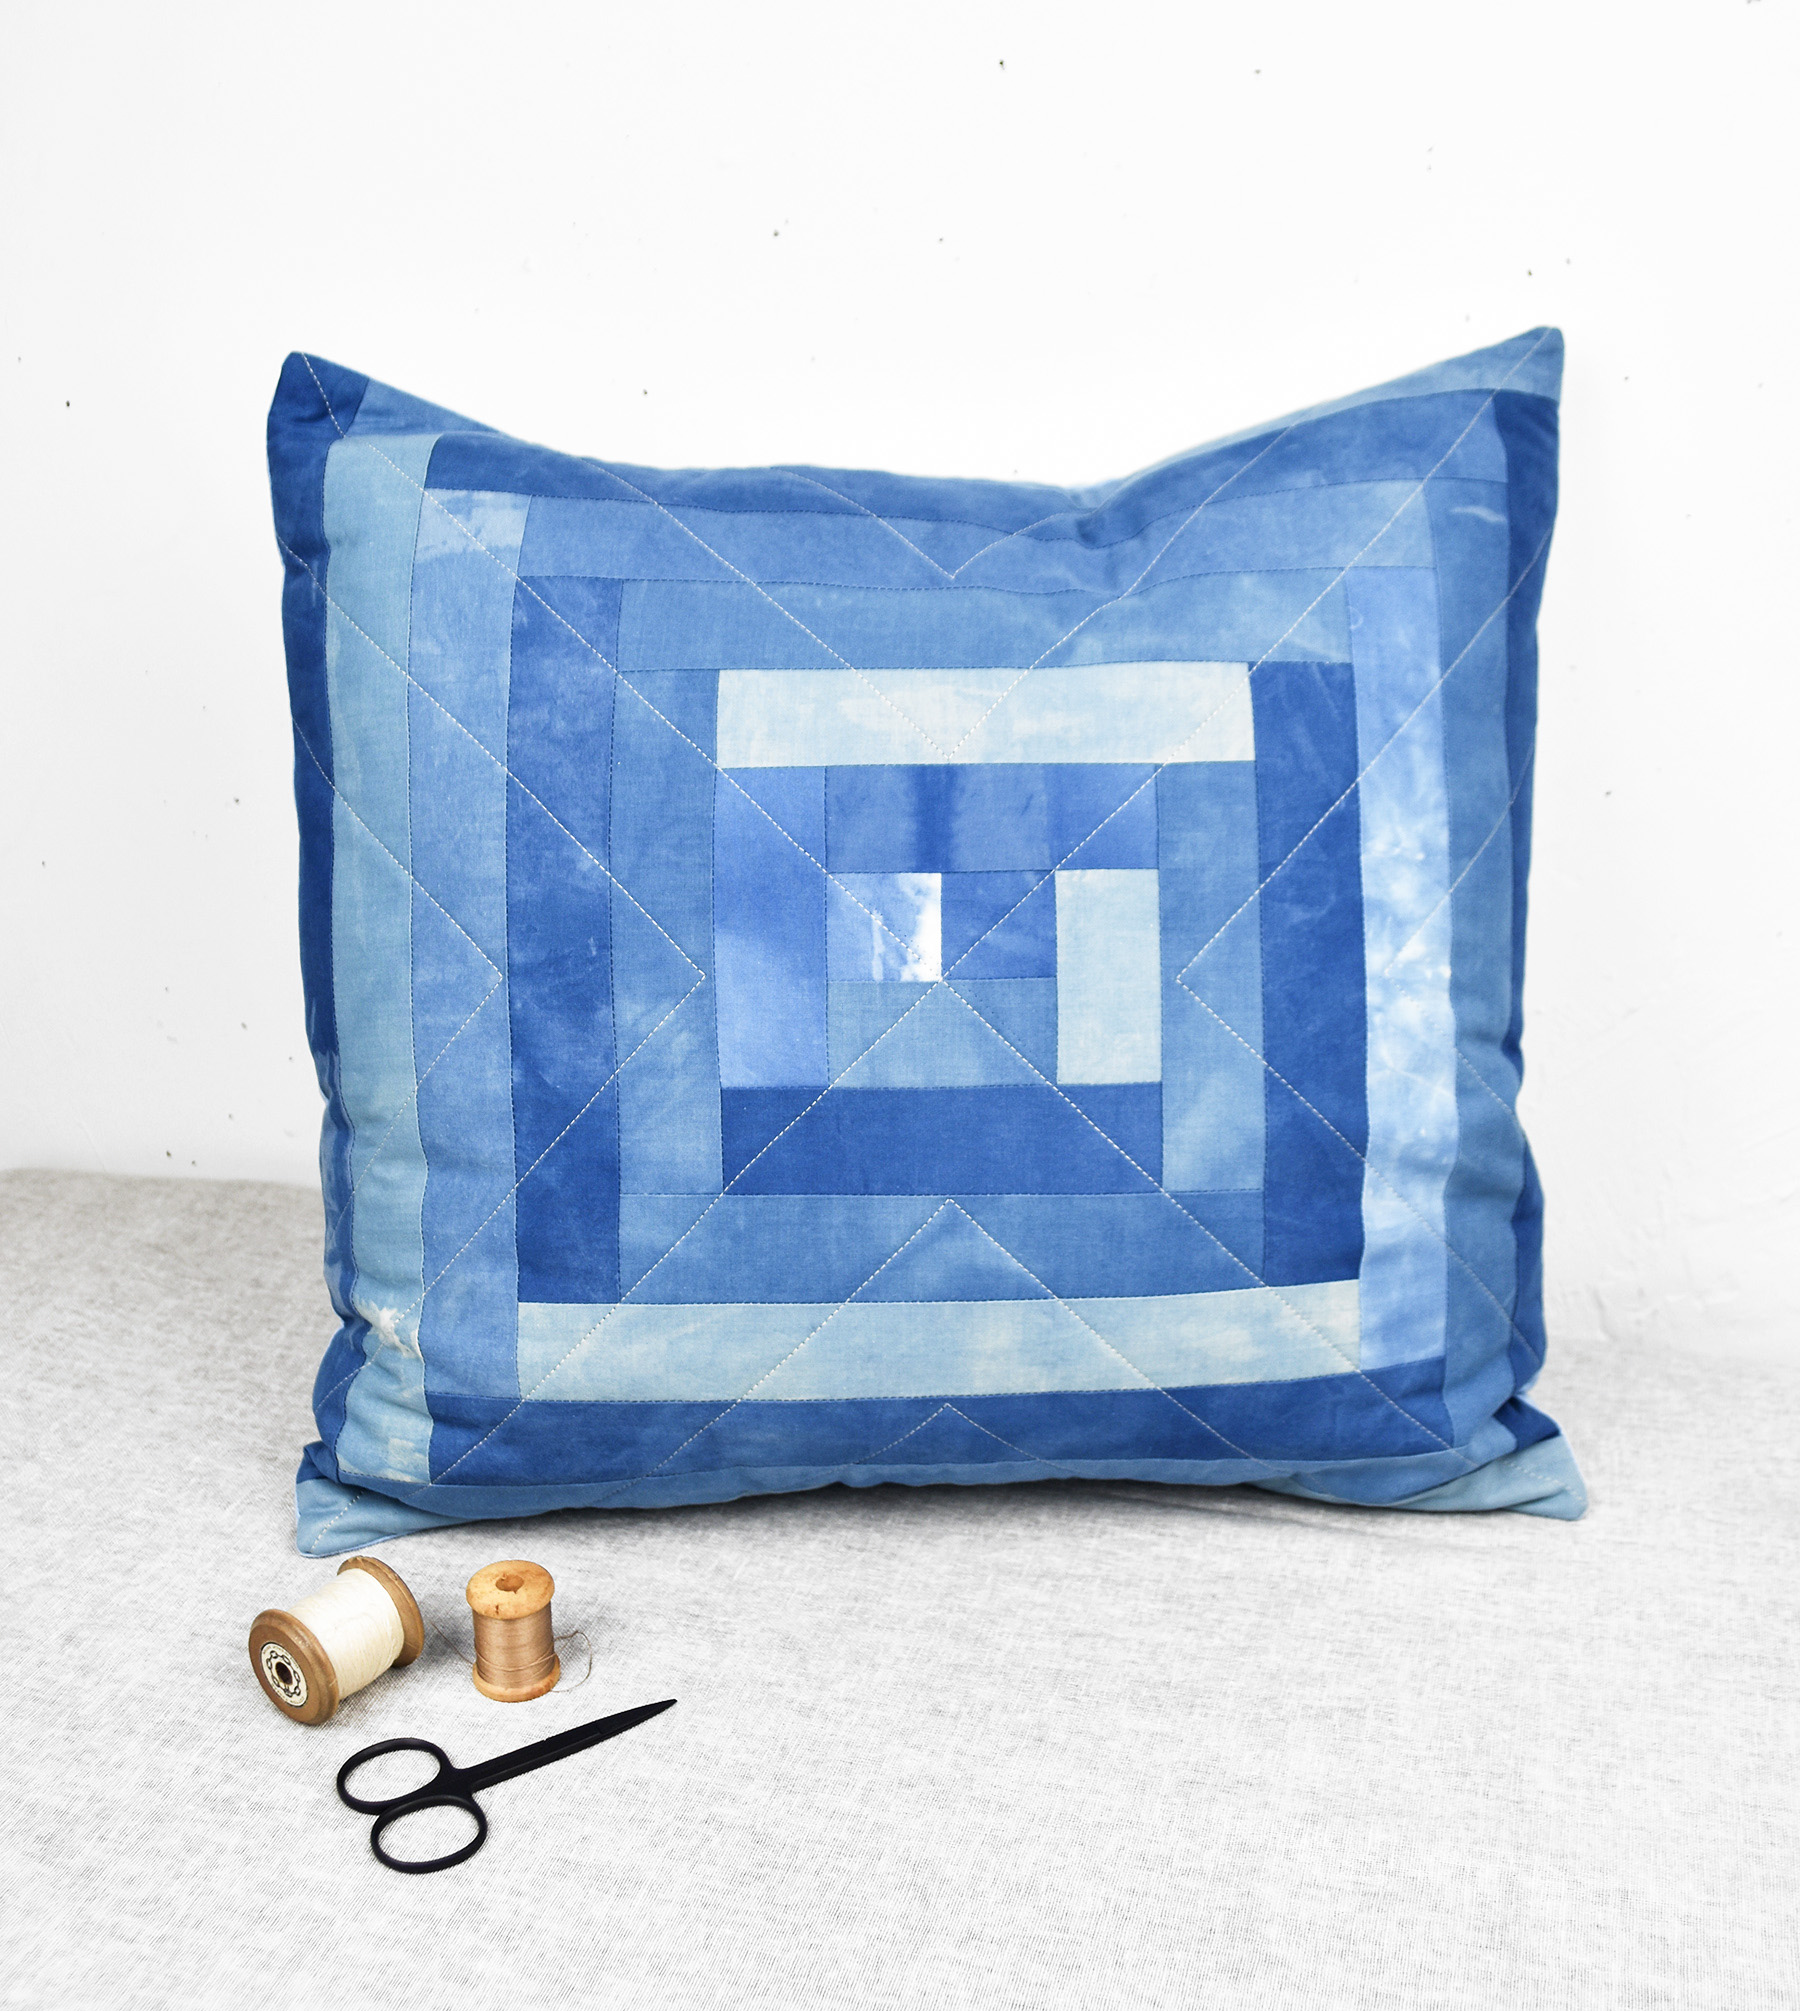
Create a gorgeous cushion cover while learning the fundamentals of classic patchwork and machine quilting in this full day workshop with Leslie Keating, a textile artist with over 10 years of quilting experience.

Teacher: Leslie Keating

Workshop Duration: Full Day

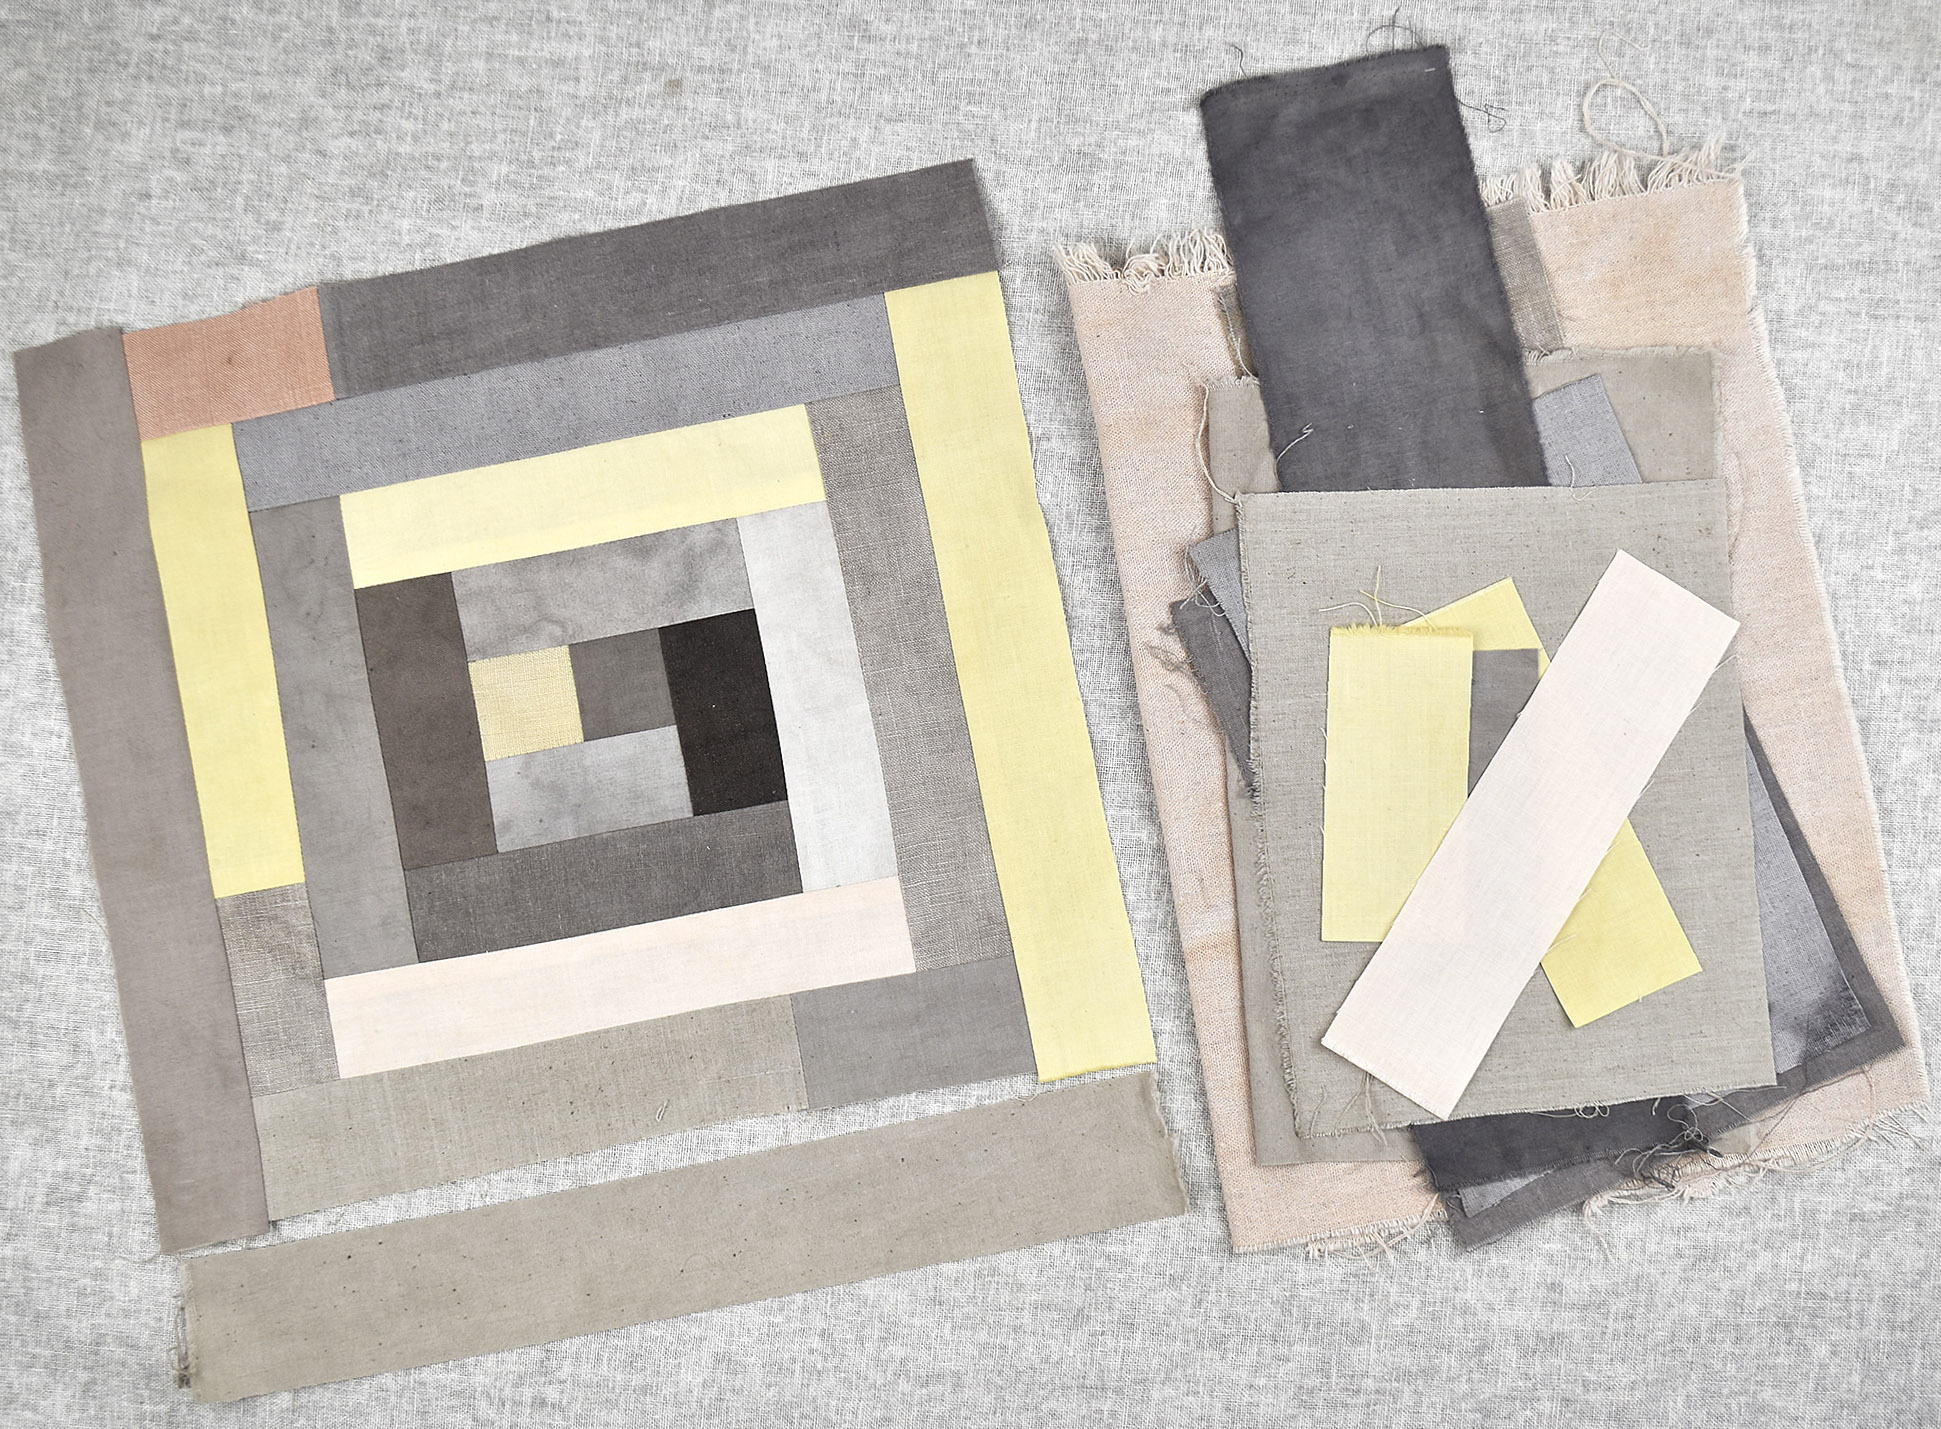
Description: The first session of this full day workshop will focus on patchwork using a classic log cabin pattern. We will discuss the basic ‘rules’ of patchwork (and when these rules can be bent or completely discarded) and give an overview of the basic steps, and different methods within, of creating a quilt top - piecing, basting and quilting. Construction of your log cabin cushion cover front will take most of the first session and will include lessons on how to use a rotary cutter and quilting ruler to cut precise strips and sewing accurate seam allowances.

The second half of the session we will learn how to thread baste (pin and spray basting and their uses will also be covered) our log cabin patchwork piece and then discuss different machine quilting pattern options. Once a pattern is chosen, you’ll learn how to mark out the quilting guide lines before moving on to doing the actual machine quilting. We’ll then trim the quilted cushion tops and construct the envelope backing for our cushion cover to complete it.

Materials to bring:

FABRIC
Optional kits are available for $38. These kits are available in either indigo or natural plant dyed colour ways and contain all fabric needed for the cushion cover, including organic cotton batting.

If you’d like to use your own fabric, please bring a variety of lengths/scraps at least 5cm wide. It’s difficult to give an accurate amount of how much fabric you will need as it depends on how many different prints/colours you’d like in your cushion but if buying fabric, to be safe, you’d need roughly a half metre cut (of standard 112cm width or wider) to complete the cushion front - so if you wanted to create a two colour log cabin, you’d bring two 25cm lengths, if you wanted to create a five colour log cabin, you’ll bring five 10cm lengths, etc. In addition, you’ll need a minimum 55cm x 55cm piece of natural fibre batting, a minimum 55cm x 55cm piece of cotton for the patchwork backing (will be the interior of the cushion so not seen) and a 50cm x 75cm minimum fabric piece for the cushion backing (midweight cotton canvas, linen/cotton or linen recommended).

OTHER MATERIALS
Sewing machine
Off-white or light grey 100% cotton thread
Pins
Hand sewing needles
Fabric scissors
A walking foot for your sewing machine is recommended but not absolutely necessary, don’t feel you need to buy one for the workshop but they are a great investment if you plan on doing more quilting projects.
Rotary cutters, rulers and cutting matts will be provided but you are also welcome to bring your own.

Takeaway: You will leave the workshop with a completed log cabin patchwork cushion cover and an understanding of general patchwork and machine quilting techniques and practices for future projects.

Level: Advanced Beginner

Prerequisites: Participants must be comfortable with the basic functions of their sewing machine, including threading, bobbin winding/replacement and straight stitch.

Homework: None

Keating  DSC_0538.jpg
Keating  DSC_0535.jpg
Keating DSC_0530.jpg

Knitting - Knit A Sweater That Fits

Experience the frustration of a sweater that either isn’t quite right or doesn’t quite fit no longer! This morning workshop will explore a number of simple steps that will ensure you achieve great fitting garments.

Teacher: Georgie Nicolson

Workshop Duration: Half Day

Description: Many knitters think that getting a sweater to fit is about taking the right body measurements and going from there but this is really just a secondary consideration. In fact, you don’t even need to take a body measurement at all! Good fit is about good preparation and this class explores a number of essentials for sweater success from yarn choice and yarn substitution, to swatching correctly and effectively, to understanding how you like your sweaters to fit. We will talk about how to use this knowledge to choose appropriate patterns and sizes that we will actually wear rather than being suckered in by the viral pattern of the moment. We will also explore how to make minor adjustments to fine-tune our fitting and the all important implications of ease and how it affects our sizing choices.

Materials to bring: Please bring to class a sweater, jumper or cardigan or two that you like the fit of. They can be store-bought or handmade. Bring along a pattern and yarn combination (or some options) that you would like to knit and a tape measure (this won’t be a class about taking body measurements!)

Takeaway: An understanding of the steps involved in getting in a sweater to fit properly. The confidence to choose patterns that will suit you and create garments that you will love for many years to come.

Level: Advanced Beginner - Intermediate

Prerequisites: Basic knitting skills; ability to cast on, knit and purl, work simple increases and decreases and a basic understanding of garment construction.

Homework: Have a flick through your Ravelry library or your pattern books and select a number of patterns that you interest you. Bring these to class.

SweaterThatFit.jpg
Fit.jpg
Fit2.jpg
Raglan.jpg
Fit3.jpg
20131128-44.jpg

Quilting - Handquilting

Come and spend a day with artist and quilter Anna Farago exploring the simple beauty of hand quilting by learning to hand stitch a cushion top or wall hanging.

Teacher: Anna Farago

Workshop Duration: Full Day

Description: The workshop will start with the essentials of how to prepare and secure the layers of a quilt. Once the layers are prepared, options for marking where to stitch will be shown and explained. Finally the hand stitching will be the focus. Participants will have plenty of time to get their hand quilting technique worked out, practiced and applied. Binding will also be on the agenda.

Materials:

Participant to bring:
TOP FABRIC - 21 x 21inches
BASE FABRIC - 21 x 21inches for backing – something plain and simple like calico or cotton, flannelette or brushed cotton or wool for back of the quilt.
BATTING - Bamboo, cotton or wool batting. Anna will have pre-cut pieces for purchase on the day - $15 for a piece of organic cotton batting.
NOTIONS - Rotary cutter and cutting mat (if you have one), water soluble fabric marker, greylead pencil, ruler, Perle 8 or sashiko thread, sturdy long needle with large eye (sashiko or straws), masking tape, fabric scissors, non fabric scissors.

Supplied Matierlas:
Some cutting matts and rotary cutter, samples and examples of quilts and cushions made using the techniques and methods to be used during the workshop. Quilting pins and clips.

Takeaway: Depending on designs and stitching time, participants will leave with a near finished hand quilted cushion top, wall hanging, or mini cloth quilt with the knowledge and instructions on how to finish it off.

Level: Beginner - Intermediate

Prerequisites: None

Homework: None

FeliciaSemple-13.jpg
HandquiltAnna.jpg
FeliciaSemple-15.jpg
QuiltedCushion.jpg
FeliciaSemple-1.jpg

Knitting - Fresh Fair Isle

Liven up your Fair Isle knitting! Spend the day with Mary Jane, authour of 200 Fair Isle Motifs: A Knitters Directory, exploring fresh new colourways.

Teacher: Mary Jane Mucklestone

Workshop Duration: Full Day

Description: This course will introduce you to the basics of colour theory and how to use its principles to guide your colour choices. We will learn about the use of colour over the years in traditional Fair Isle knitting and move beyond, developing our own personal colour schemes. We’ll analyse how different colour combinations can completely change how a motif looks. Knitting a simple stranded wristlet or fingerless glove will quickly illustrate new concepts.

Materials to bring:
Between 3 and 8 colours (or more, more colours = more fun!) of fingering weight wool yarn (Shetland Wool preferred), 25-100 yds of each colour
US size 3 (3.25mm) dpns or your preferred needles for working small diameter pieces in the round
Tapestry needle
Scissors
Stitch markers
Graph paper and coloured pencils, if desired.

Takeaway: Students will gain confidence choosing and blending colours in their own knitting, and leave with a solid foundation for further colour exploration.

Level: Intermediate

Prerequisites: Experience working in the round with stranded colourwork.

Homework: With any colour fingering-weight yarn you like, CO 48 sts. Place marker, join to work in the round without twisting. Work k1, p1 rib for 1" (2.5 cm).

Fairisle-20.jpg
FairIsleStyle.jpg
Screenshot 2018-04-27 22.20.13.png
Fairisle-3.jpg

Sewing - Lodo Knit Dress

True Bias’s Lodo dress is an elevated take on a basic t-shirt dress. It’s designed to be sewn in a stable knit and is both stylish and comfortable to wear.

Teacher: Anna Ng

Workshop Duration: Full Day

Description: The Lodo Dress was designed for medium-weight knit fabrics like ponte, light-weight scuba, and cotton interlock… which we all know means secret pajamas!

The dress features a flattering deep v-neck, extended cap sleeves and a choice of two hem lengths. The Lodo Dress has been designed as an everyday dress that pairs perfectly with a denim jacket and sandals and is also perfect when you want to look a little more put together without much effort.

Both the neckline and armholes are finished with a woven facing, which gives you the chance learn new skills and use up some treasured woven scraps from earlier projects.

In this class you will learn how to:

Select your size
Make minor fit alterations (ie. grading between sizes or adding/subtracting length)
Cut out your pattern
Sew ponte fabric on a domestic sewing machine
Learn about stretch stitches
Apply a woven facing to knit fabric
Understitch your facings
Secure the hem with a twin needle and woolly nylon thread

At the end of the class you will have made your very own Lodo Dress

Materials to bring:
A copy of the Lodo Dress Pattern PDF and the instructions (Anna will be providing cut out patterns for each size on the day)
1.1m – 2.5m (see the fabric consumption chart for each size and width) x 140cm medium-weight stable knit fabric with an approximate 25% stretch such as ponte, cotton interlock, and lightweight scuba
All purpose polyester thread to match your fabric
Sewing machine
Jersey ball point sewing needle
Fabric scissors
Paper scissors (for cutting out your pattern)
Pen, pencil & eraser (for any pattern modifications)
Pins
Tailors chalk
Measuring tape
Quick unpick

Takeaway: At the end of the class you will have made your very own Lodo Dress

Level: Beginner

Prerequisites: Familiarity with a sewing machine and straight-stitching experience.

Homework: None

Screen Shot 2018-04-27 at 1.16.26 PM.png
Screenshot 2018-04-29 10.40.46.png
Screenshot 2018-04-29 10.41.07.png

Sewing - Fly Front Zippers

This purely techniques class will step you through the process of sewing a fly-front zipper. After the class, with your newly gained fly-front zipper skills, you’ll have the confidence to tackle the trickiest sewing part of jeans and trouser sewing.

Teacher: Anna Ng

Workshop Duration: Half Day

Description: Are you interested in sewing your own jeans or trouser and would relish the chance to sew a sample fly-front zipper without the pressure of making a finished garment? Then this half day techniques class is just what you’re looking for.

Using a single-sized cut-down pattern created especially for this class, Anna will step you through the process of sewing a sample fly-front zipper. Specifically, the class will focus on:

Seam finishes
The wonders of machine basting
Zip insertion
Those necessary but sometimes confusing fly extensions and facing pattern pieces
Top-stitching

Materials to bring: There will be a materials change for this class that includes the sample fly-front pattern & instructions and denim fabric. Details to follow.

Students to bring:
All purpose navy & one other colour polyester thread (the second colour is for machine basting)
Sewing machine with a zipper foot
Two bobbins (one for each thread colour)
Denim sewing needle (a brand new one will give you the best results)
Fabric scissors
Pins
Tailors chalk
Measuring tape
Quick unpick

Takeaway: At the conclusion of this class, you will have sewn your very own fly-front zipper sample. Please note, this will not be a wearable garment, but a sample piece showcasing all the new skills you’ve learnt.

Level: Advanced Beginner

Prerequisites: Familiarity with a sewing machine and straight-stitching experience.

Homework: None

Flyfront-4.jpg
Screen Shot 2018-04-27 at 1.17.33 PM.png
Flyfront-1.jpg

Spinning - Wheel Spinning 101

There is immense satisfaction to be had in being part of the creation of a yarn. Spinning, and the decisions you make as you spin, are an integral part of this process. It’s time to shake off those negative associations of spindles (yes, you Sleeping Beauty!) and celebrate a craft that has been practised mostly by women to build and support civilisations over thousands of years.

Teachers: Adele Moon and Rebecca Marsh

Workshop Duration: Full Day

Description: From fleece to fibre you will learn about the wonderful world of spinning your own yarn. You will learn about the fibres, where to source them and how to prepare them. With a bit of practise you will learn how to spin a continuous thread.

There will be fleece to spin, fibres to explore and spinning wheels to spin. There will be lots of samples to see and plenty of advice and guidance on hand. This workshop promises to be a full immersion into the world of spinning which will, we hope, leave you wanting to explore this amazing craft further!

Materials to bring: $10 materials fee

Takeaway: This is a technique focused class. You will come away with some handspun yarn, extensive notes and a broader understanding of the world of spinning.

Level: For beginners and people with a basic understanding of spinning

Prerequisites: None

Homework: None

FeliciaSemple-30.jpg
FeliciaSemple-14.jpg
FeliciaSemple-28.jpg
FeliciaSemple-58.jpg
FeliciaSemple-56.jpg

Dyeing - Spectacular Speckles and Hand Paints

In this class with Hannah Ginn of Circus Tonic Handmade you will be introduced to hand dyeing knitting yarn with speckles and splashes of colour use both vibrant and subtle minimalist techniques.

Teacher: Hannah Ginn

Workshop Duration: Full Day

Description: The class will begin with a fabulous yarn appreciation session talking about dyers, different yarn bases, colours, themes and inspiration and there will be lots of examples of skeins and knitted samples to squish. A large section will focus on the art of matching hand dyed yarns to modern knitting patterns and how to achieve successful finished objects.

We will then focus on inspiration and aesthetics, which ties in to the knitted garment and how designers are using speckled hand dyed yarns for accessories and garments.

The class will then cover safety, personal protective equipment (PPE), a little chemistry and theory. We will cover different dyes on the market, skein management and handling and finally the actual dye pot techniques. We will aim for a speckled and mutlicoloured skeins to suit the taste of the student. We will also cover hand painted and the layering effect of many techniques to achieve the gorgeous skeins so popular at the moment. The class will cover the process and after care of the skeins; soaking, drying, skeining, storage and environmental care.

Materials to bring: This a materials heavy class so there will be a materials cost of $50. You will be provided with:
Bare yarn mini skein pack
Dyes
Nitrile gloves
Dust masks
Safety glasses
Wire loops
Notebook and pencil
Swatch card
Disposable cups
Speckling Spoon
Dropper

Each student will need to bring:
A light coloured or undyed skein from their stash.
Cotton liners for under gloves (these can be bought at the chemist)
A coloured picture or sketch for inspiration
Closed shoes, preferably not trainers with mesh tops
Hair bands for long hair

Takeaway: Each student will have learned how to manage skeins, match hand dyed yarn to patterns, which bases to start with at home, how to dye speckled and hand painted yarn, how to use professional acid dyes correctly, and will come away with several miniskeins of yarn they’ve dyed themselves. A swatch card may be made with their and their fellow students yarn if they would like to swap experiences and recipes.

Level: Beginner-Advanced Beginner

Prerequisites: None

Homework: The students are to bring the materials requested. They may also bring their favourite hand dyed yarn if they may be interested to reverse engineer it!

Ginn-speckles_3.jpg copy.jpg
Ginn-Speckles_1 copy.jpg
Ginn-speckles_4 copy.jpg
prev / next
Back to 2018 Workshops
3
Dyeing - With Indigo and Food Waste
2
Knitting - Scandinavian Knitting
4
Knitting - Steeking
4
Handwork - Handpiecing
4
Knitting - Two Colour Knitting
3
Handwork - Darning
4
Knitting - Top-down Raglan In A Day
4
Handwork - Embroidery Sampler
2
Sewing - With Silk
3
Dyeing - Semi-solid Tonals And Glazing
4
Knitting - Joyful Shortrows
6
Printing - Block Printing
5
Handwork - Herbal Self Care Bag
3
Quilting - Machine Quilted Log Cabin
6
Knitting - Knit A Sweater That Fits
5
Quilting - Handquilting
4
Knitting - Fresh Fair Isle
3
Sewing - Lodo Knit Dress
3
Sewing - Fly Front Zippers
5
Spinning - Wheel Spinning 101
3
Dyeing - Spectacular Speckles and Hand Paints
Featured
Making Fast Fashion: Some More Of The Grey
Apr 19, 2022
Making Fast Fashion: Some More Of The Grey
Apr 19, 2022
Apr 19, 2022
Is My Making Fast Fashion?
Apr 12, 2022
Is My Making Fast Fashion?
Apr 12, 2022
Apr 12, 2022

We Live and work on the traditional lands of the Wurundjeri people of the Kulin nation.
We acknowledge that sovereignty was never ceded and pay our respect to elders past, present and emerging.

Copyright the Craft Sessions 2020

Logo designed by the lovely Mara of Printspace and Girling Design