
Learn to read your knitting – Part 2 – Decreases
Thanks for all the love for Part 1 of our new series, Learn to Read Your Knitting. If you want to have a look at Part 1 you can find it here - The Secret to Becoming a Great Knitter.
Learning to read which kind of decrease you have made, and how many rows you have knitted since the last decrease, is one of the simplest and yet most helpful things you can learn.
Learning to read which kind of decrease you have made will come in handy when you have done something like heavily modified a sleeve, left it for a year and then are trying to figure out what you did OR when you see (as I once did) a gorgeous vintage pullover in a cabinet displayed on the wall and you are desperate to copy the gorgeous raglan shaping it had.
And learning how to count the rows since your last decrease row gives you total freedom from writing down the number of rows that you have completed. Freedom!! And it means you can quickly power through knitting the body or sleeve or yoke without needing to refer (too often) to your pattern.
Today we are going to look at the two most common decreases - a k2tog (knit two together) and a ssk (slip slip knit). K2tog is a right leaning decrease. The ssk is a left leaning decrease that is similar to the sl1k1psso in look - so what I write about the ssk will also apply to that decrease.
These decreases are commonly used for;
- sleeves when working from the top
- yoke decreases when working from the bottom e.g. in a raglan
- side seam decreases when working from the bottom.
1. What is a decrease stitch?
A decrease stitch is simply a single loop pulled through two (or three) stitches - decreasing the number of stitches from two (or three) to a single stitch. This is true regardless of whether it is a k2tog, ssk, sl1k1psso or even a sl1 k2tog psso.

2. Reading the number of rows since the decrease row
The theory for reading the number of rows you have knitted since you did the decrease row, is exactly the same no matter what type of decrease you are doing – and it is easy to learn. The only thing that is a slight bit trickier, is reading the number of rows it in the round versus doing it flat. Both are so easy though, you will be reading your knitting in no time.
Again you can do this yourself. Just watch your decreases as you make them. Learn what they look like. Please remember to only use light/mid coloured yarn that isn’t too fluffy when you begin. Round yarns are easier too. AND we are still working only on stocking stitch. Again my apologies for my pictures which are still using a yarn with a slight twist. I am away and a bit stuck with what I have on hand.....

The decrease point can often be found as we can see two lines of Vs merging and/or if you run your fingers around the fabric (thumb on top and pointer underneath) then you can often also feel it. Along a sleeve, this decrease is often in the curled up edge if you are knitting flat. This finger trick will help - it doesn't work so well with a flat yarn - round yarns are easy.
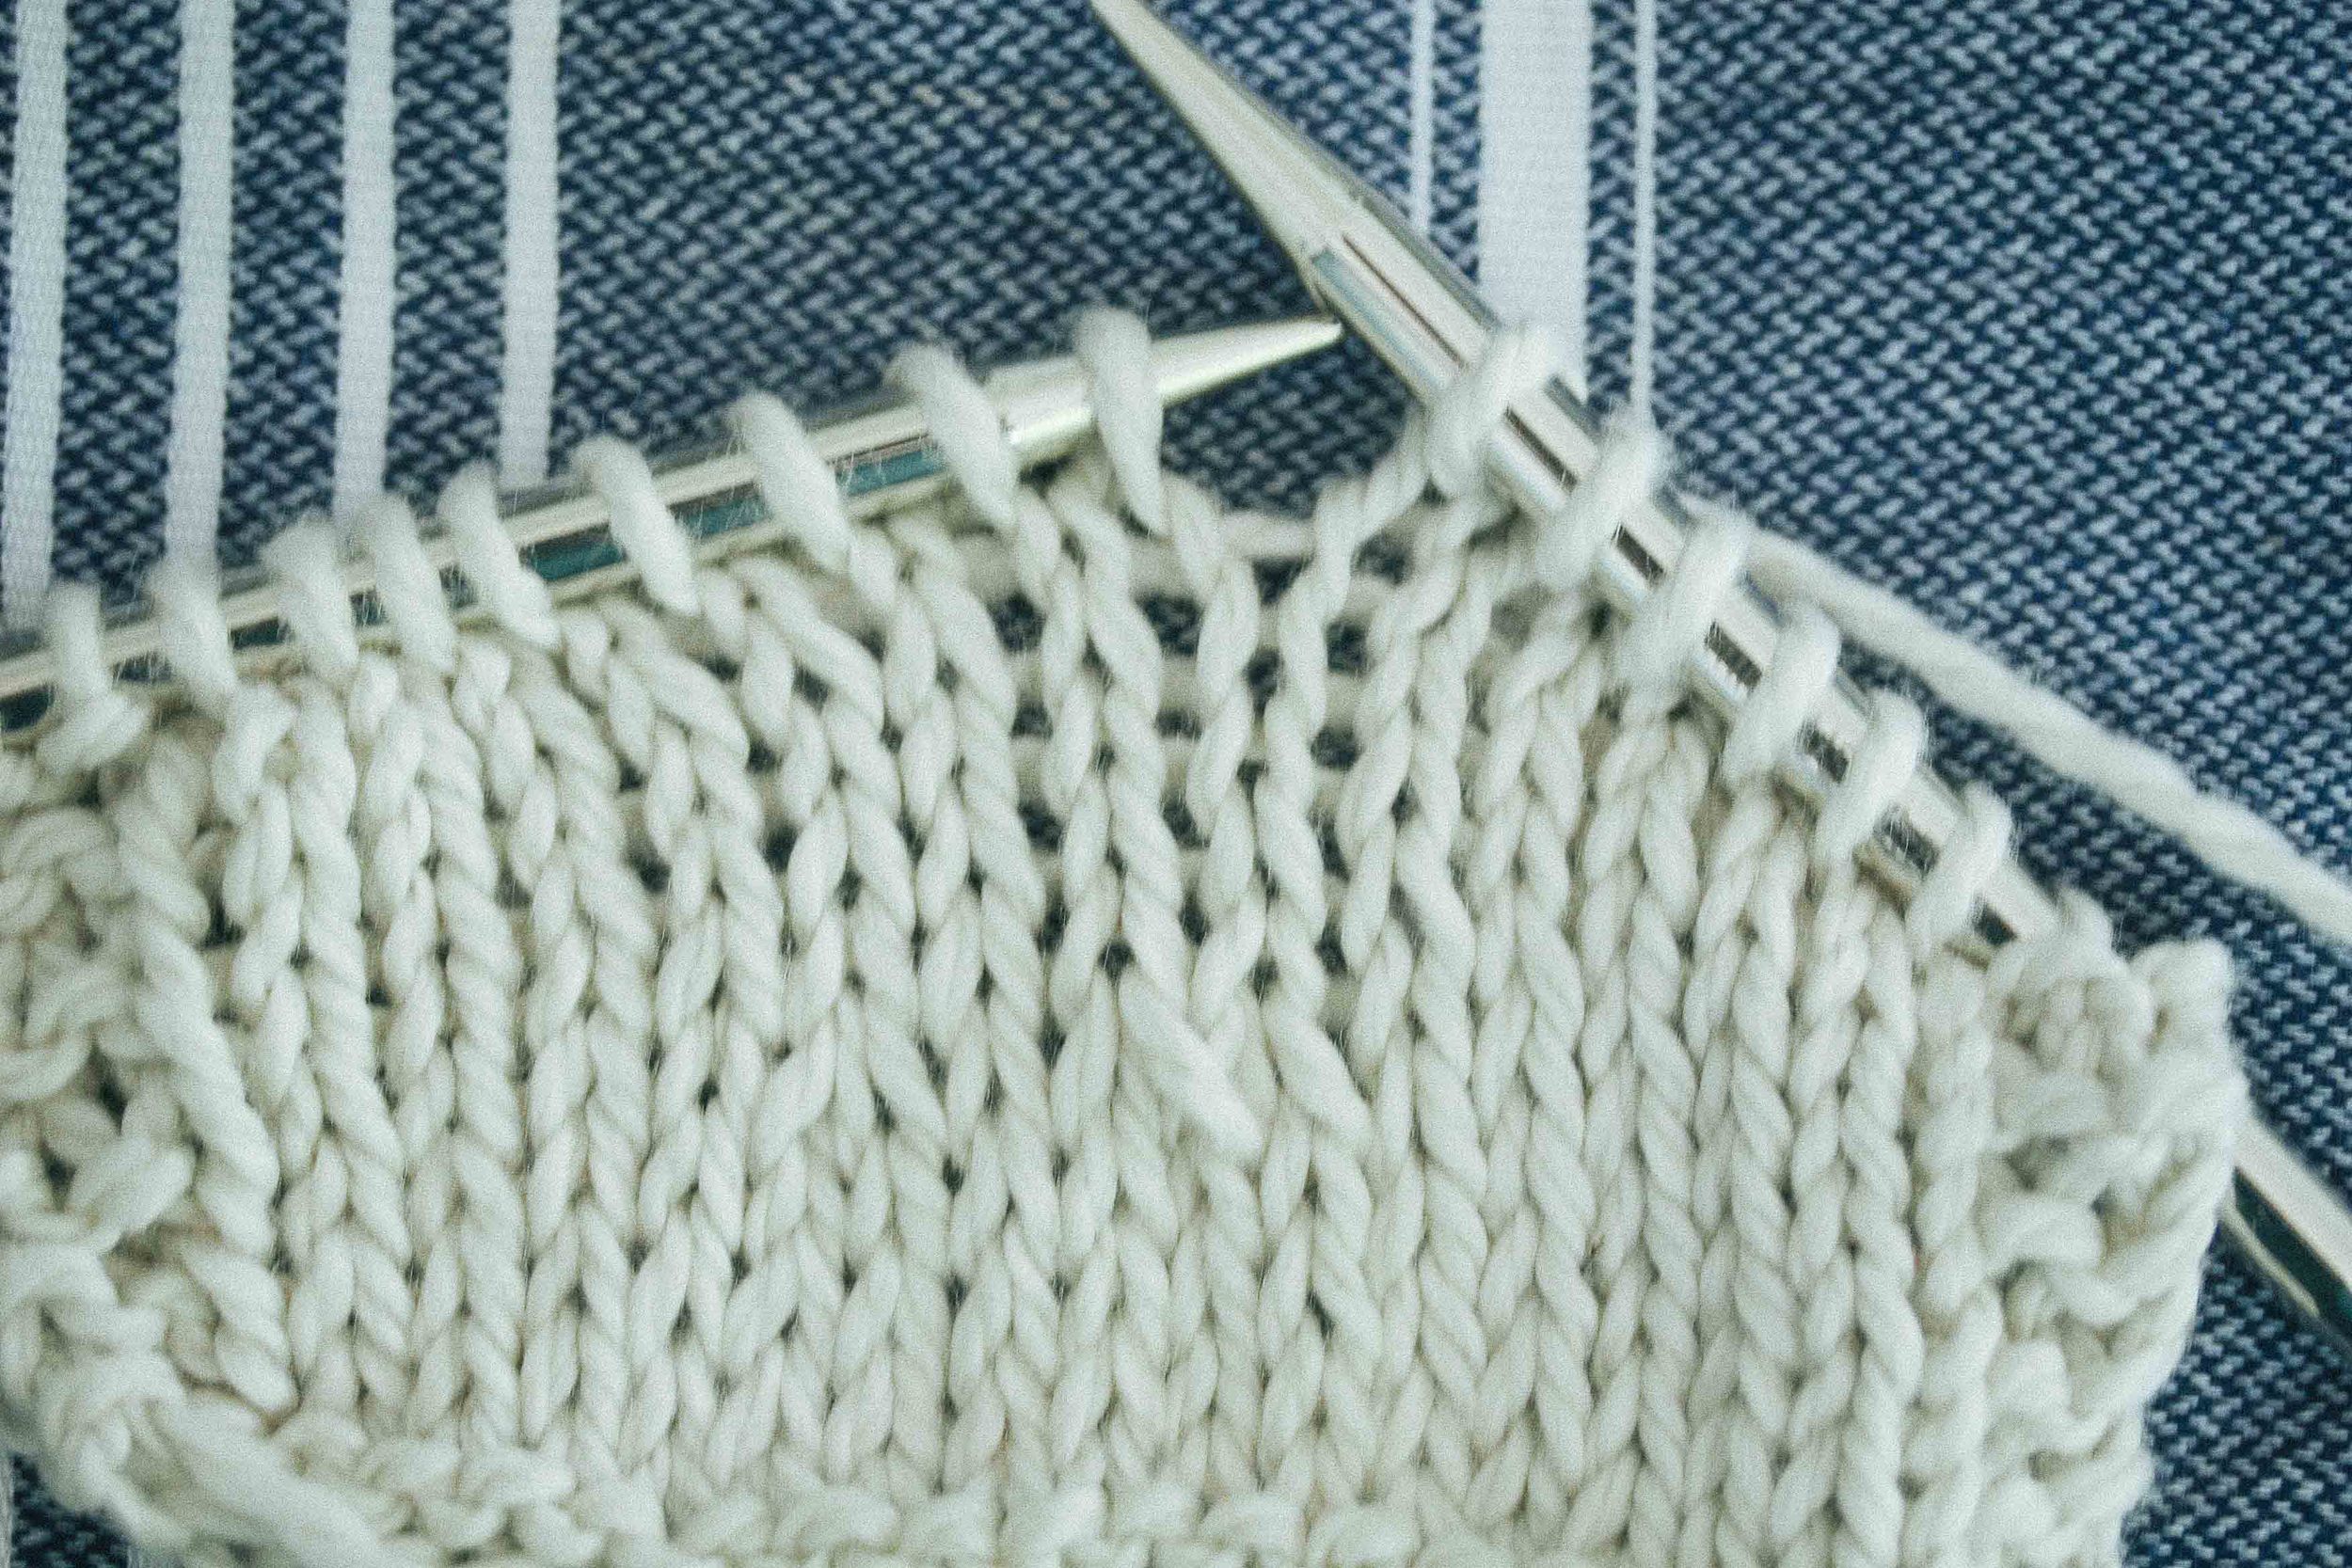
To read the number of rows since the decrease we simply need to find the single loop that was pulled through the two loops and then we count up from there. That single loop is in the decrease row.
Look for one stitch sitting on top of another and find the loop coming out of them. AND because we know that the structure of a knit stitch has a V at the bottom and a loop at the top, we can count upwards starting with the hole in the middle of the V. Poke your needle tip into each hole in the V - it helps!

The decrease stitch is the loop below the stitch on the left hand needle. You can see the two stitches that were decreased below this stitch.
The decrease row is generally the first row in the decrease repeat section of the pattern. Normally a pattern will say something like;
“ROW 15: (RS) Decrease row......
ROW 16-22: Knit 7 rows in pattern.
Then repeat Rows 15-22 X times.”
So an 8 row repeat in this case.
So here is the key to counting - The number of rows we have knitted including the decrease row/round includes the stitch (the loop) that comes out of the two loops, then all the Vs in a direct line above it, as well as the stitch that is on the needle.

Count the rows and see if you can figure it out. Answer at the end * - a bit like the crossword in the paper ;)
How I wish you were all in my lounge right now so I could show you rather than trying to type it out. I have made you some pictures and hopefully they help but if I have lost you then please ask questions in the comments. I'm going to try saying it a few different ways to bring you all along, so please feel free to skip ahead if you have got it.
So to really spell it out - our pattern tells us to do a decrease row and then to knit 7 rounds, then we are looking for 8 stitches total in a vertical line above the two stitches sitting on top of one another. The decrease stitch (which is the loop pulled through the two stitches) as well as the stitch on the needle are both included. We have the first loop (pulled through the two stitches), six more Vs above it and then a stitch on the needle which makes your 8. In an eight row repeat you are due a decrease round for the next row.

And another one - this time we are looking at the decrease below the first stitch on the left needle. This one is a k2tog and a little trickier to see. Look for two lines of stitching becoming one. One of the two stitches sits behind the other. Again the number or rows is at the end**
If we are knitting a flat piece of work, it is a little simpler to count the number of rows because we know if we are at the start of a right side (RS) row then we have knitted an even number of rows including the decrease row.
If we are knitting in the round we don’t have the advantage of being able to assume that we have completed an even number of rows BUT because we can count our Vs, then we simply carefully count up and include the stitches on the needle. Done.
The picture below is an example of what it would look like when you are up to a yoke decrease. When you are counting rows to decrease at the yoke then you often do the decrease round every second row. If you have one loop coming out of the decrease stitch (which the stitch on the left needle below) then it is time for another decrease round.
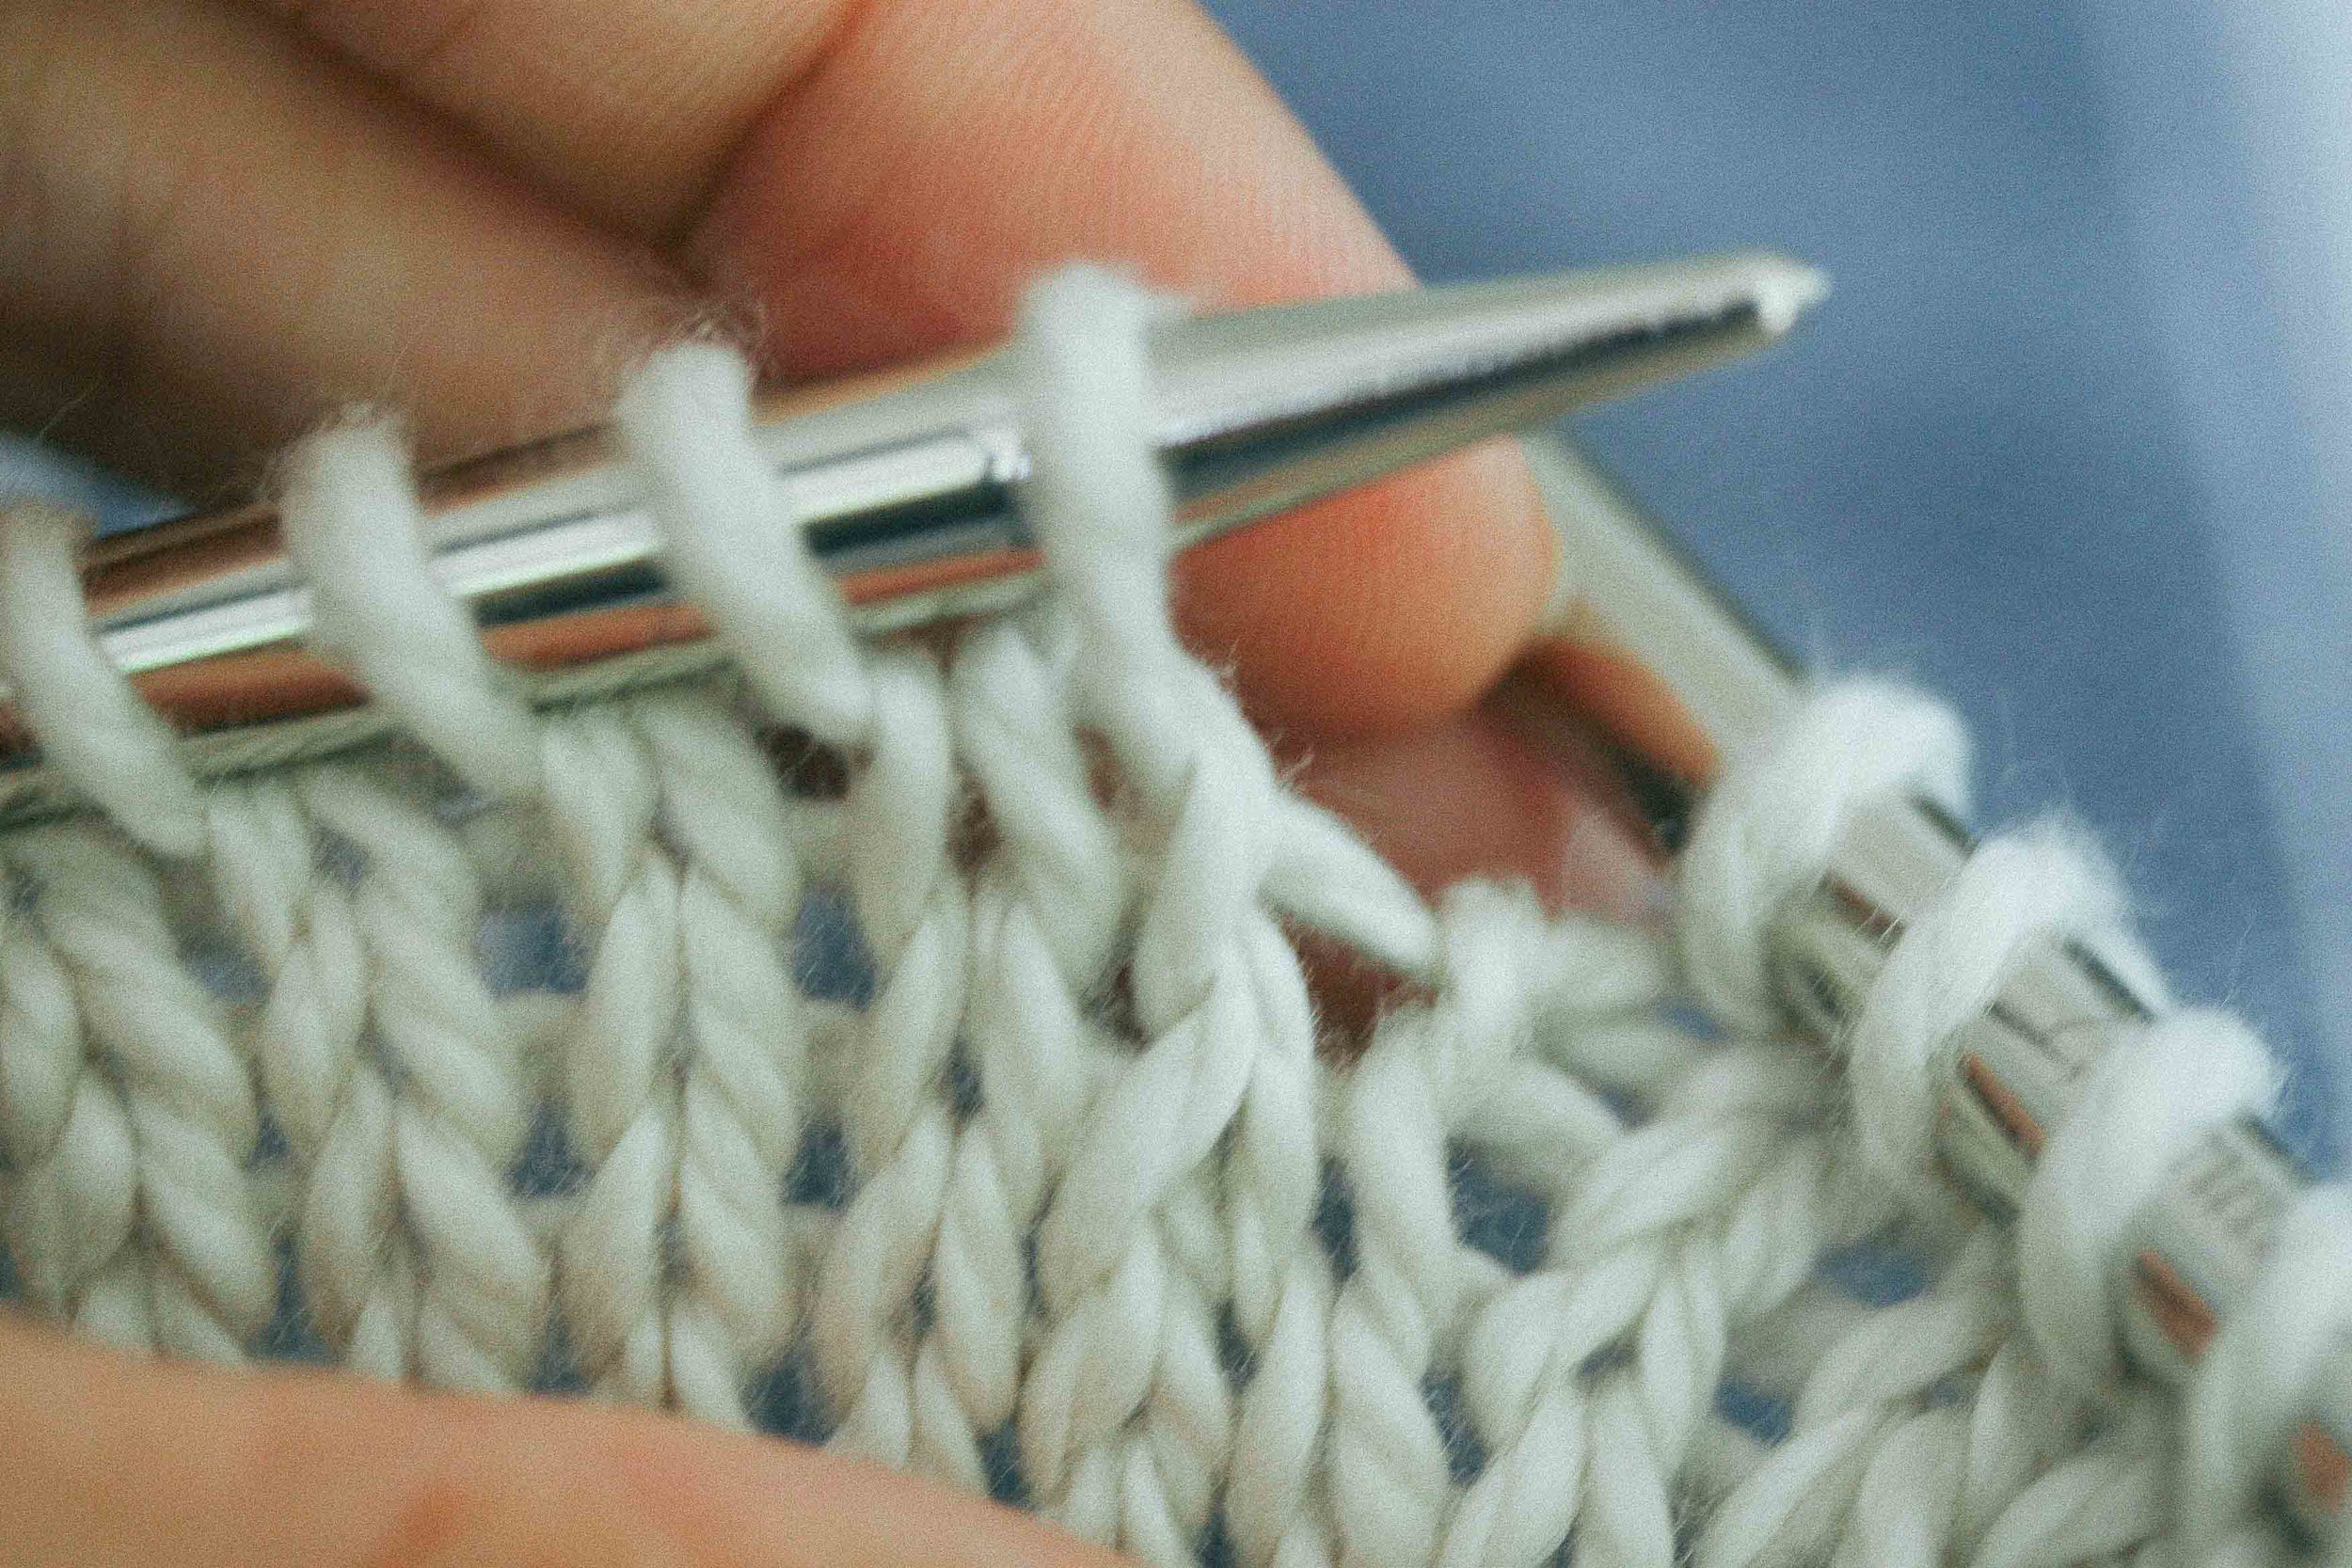
If this was a yoke, and the decrease was every second round we would be up to a k2tog.
3. What kind of decrease is that?
OK. So the final thing we need to understand today is the difference between what a ssk (left leaning) and a k2tog (right leaning) look like. There are other variations you will do and you should learn them over time but these two are the most common.
This is tricky to explain but pretty simple. The pictures should help I hope.
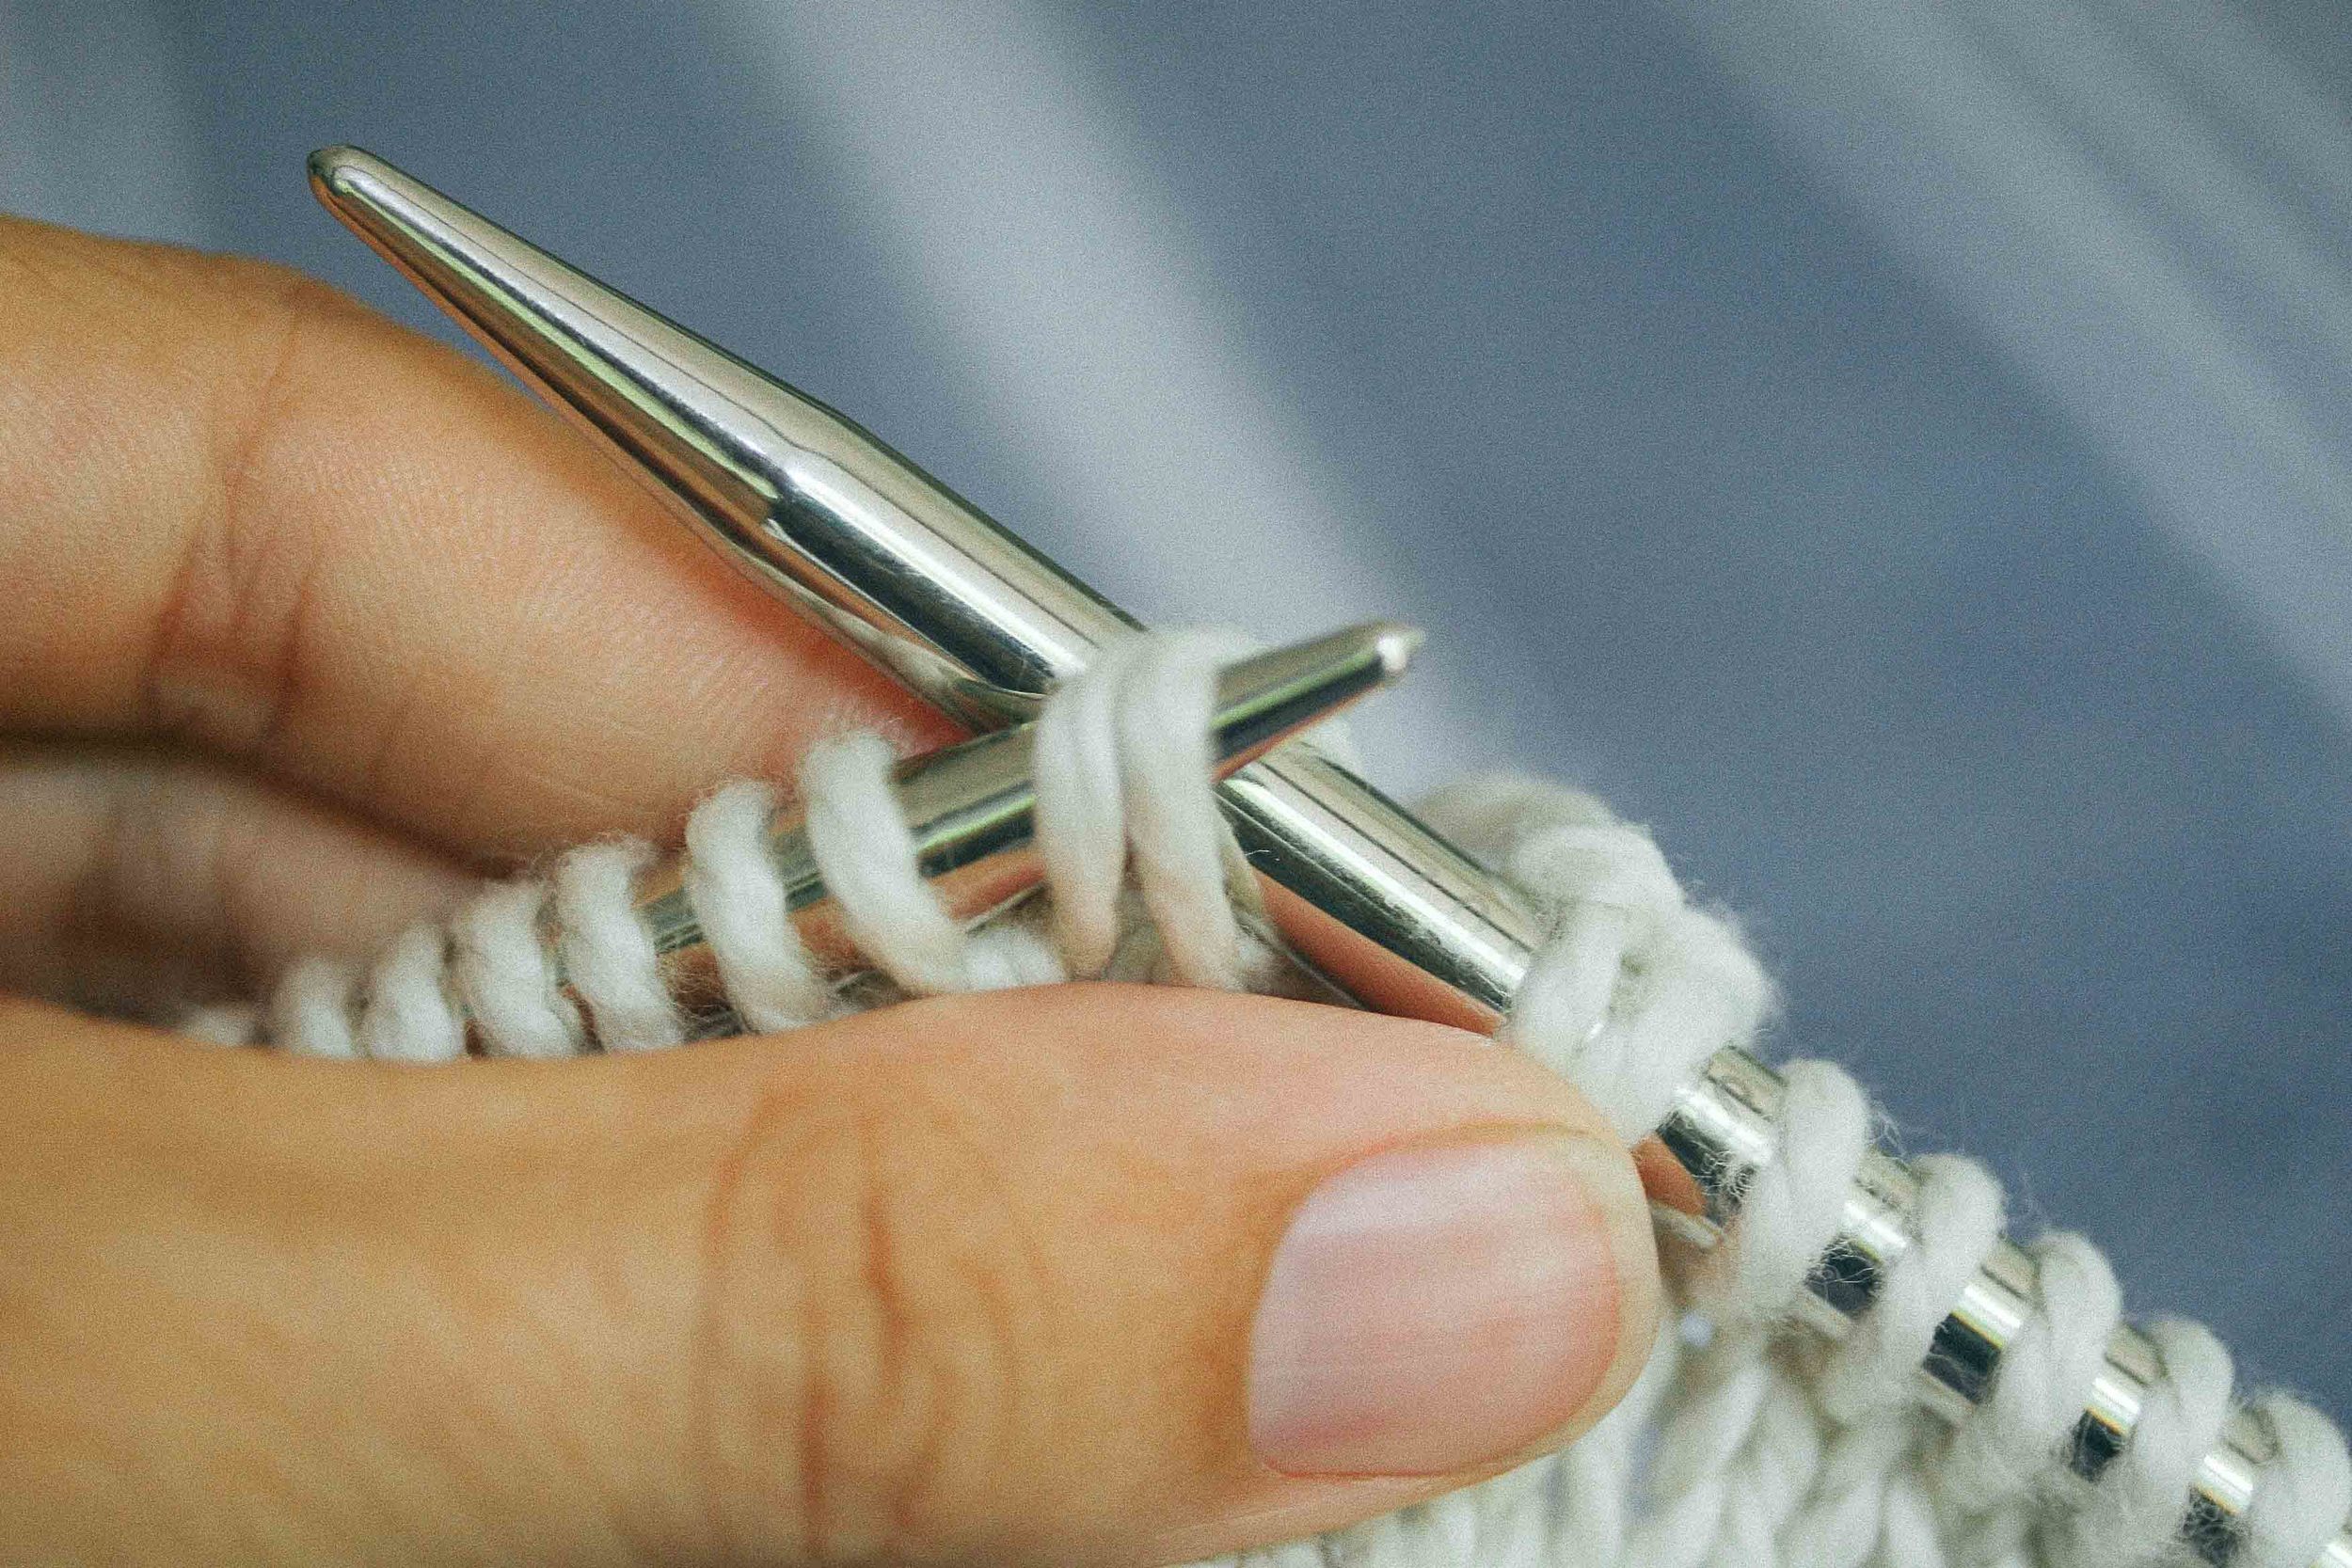
The key is this - whichever stitch goes onto the right needle first when doing the decrease dictates which way the stitch will lean and which decrease you have done. The stitch that is first on the right needle ends up in front of the second stitch on the needle.
When you do a k2tog you put the right needle tip into the second stitch on the left needle before then putting it into the first stitch on the left needle.

Right needle into the second stitch on the left needle and then the first stitch on the left needle. This pulls the second stitch in front of the first.

The single loop is pulled through the two loops from back to front.

A little hard to see due to my yarn but look just below the stitch on the right hand needle. You can see that the second stitch is now sitting in front of the first.
This pulls the second stitch on the left needle on top of the first. The loop is then pulled from the back to the front through the first stitch on the left needle first and then through the second stitch on the left needle - giving you a right leaning decrease. The second stitch ends up on top.
With a ssk you are changing the order of the stitches to ensure that the first stitch on the right needle is actually the first stitch on the left needle. This pulls the first stitch on top of the second stitch giving you a left leaning decrease.

Slip one stitch from left needle to right.

Slip the second stitch from left to right needle.

This means that now the first stitch went on to the right needle first so it will end up on top.

The single loop being pulled through the two stitches on the needle.

The first stitch is now sitting on top of the second stitch.
As always the best way to learn is to watch what you are knitting. Have a look at your decreases. Straight after you have done one. On the next row and the next. It will make sense in time - promise!
Questions?? Happy to answer anything - and also please let me know if there is something else you want me to tackle.
Next up we do increases.....
Felicia x
UPDATE: Learn to Read Your Knitting - Part 3 - Increases is now up on the blog.
Learn To Read Your Knitting - Part 1 - Stitch Structure - post was called The Secret to Becoming a Great Knitter.
*Including the decrease row there are six rows. The decrease is a ssk.
**Including the decrease row there are eight rows. The decrease is a k2tog.

